Noise Cancelling Not Working on Windows 11? Fix It in 5 Minutes
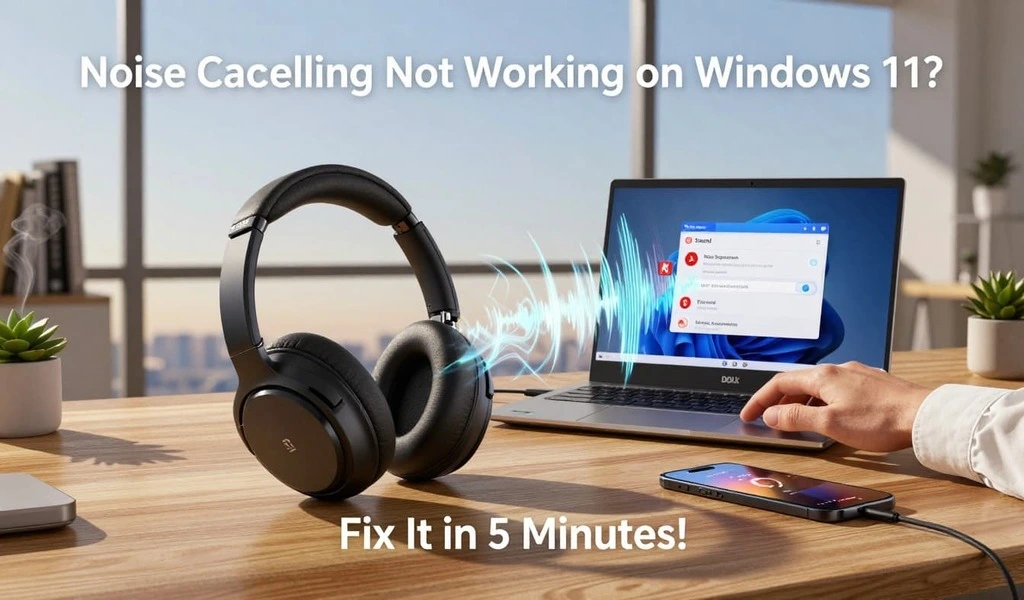
Meetings sound messy, keyboard clicks cut through, and that “quiet bubble” feeling is gone. If noise cancelling not working on Windows 11 started right after an update, or only happens in one app like Teams, it usually comes down to a simple setting change, a mic permission block, or a Bluetooth mode switch.
This guide starts with five quick checks that solve many cases quickly. Then it moves into deeper fixes (Realtek options, Studio Effects, driver rollbacks, Bluetooth hands-free issues, and Teams settings) that often get missed.
For more simple tech guides, visit TechBasics101
Start here, 5 fast checks to fix it in 5 minutes
Test each step right after doing it, stop as soon as the audio is back to normal.
- Confirm the right input and output device
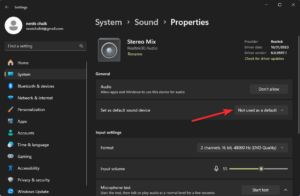
Open Settings > System > Sound, pick the correct Output (headphones) and Input (your headset mic, not the webcam). - Disconnect and reconnect Bluetooth
Turn Bluetooth off, wait 10 seconds, then turn it back on and reconnect the headset. - Turn off audio enhancements and spatial audio (for testing)
In Sound settings, open your device properties and set enhancements to Off. Spatial audio should be Off while testing. - Restart the PC and the headset
Power-cycle both. For earbuds, put them in the case for 10 seconds, then take them out. - Test in Windows Voice Recorder before opening Teams/Zoom/Discord
Record 10 seconds in a noisy room. If it’s bad here, the problem is Windows or drivers, not the meeting app.
Why is noise suppression not working on Windows 11?
A Windows 11 noise cancellation problem usually happens because Windows is listening to the wrong microphone, an app isn’t allowed to use the mic, or the audio stack is processing sound twice (Windows plus a driver app plus Teams).
Here are the most common root causes, in plain terms:
- Wrong mic selected: Windows picks a webcam mic instead of the headset mic, or it switches from USB to Bluetooth.
- Mic permissions blocked: Privacy settings can stop apps from using the mic even if the device “looks connected.”
- Enhancements or Studio Effects conflicts: Features like Voice Focus can over-filter or behave oddly after an update.
- Driver updates changed settings: Realtek and OEM drivers can reset noise options or swap enhancement defaults.
- Windows Audio service glitches: After sleep, docking, or updates, the audio service can get stuck.
- Bluetooth switching profiles: The headset flips into “hands-free” call mode, and quality drops.
Hardware ANC (headphones) vs Microphone noise suppression (Windows/apps)
| Feature | Hardware ANC (headphones) | Microphone noise suppression (Windows/apps) |
|---|---|---|
| What it affects | What you hear (background sound around you) | What others hear from your mic |
| Where it is controlled | Headset buttons, headset app, firmware | Windows settings, driver tools (Realtek), apps (Teams/Zoom) |
| Common problems | Low battery, wrong ANC mode, firmware issues | Wrong mic selected, permissions blocked, enhancement conflicts, Bluetooth profile switches |
| Best test method | Turn ANC on and off and listen in a noisy room | Record a clip in Voice Recorder (or Teams test call) and compare |
ANC in your headphones vs microphone noise suppression, what is the difference?
Headphone ANC is built into the headset. It reduces the noise you hear, like fans or traffic.
Mic noise suppression changes what other people hear from you. A quick test is to record a short clip in Voice Recorder in the same noisy spot. If your voice sounds “underwater,” that’s mic processing, not headphone ANC.
For headset-specific issues, Microsoft’s troubleshooting steps for Surface Headphones are a good example of what to check (firmware, pairing, and device controls):
Bluetooth hands-free mode can make everything sound worse
Bluetooth headsets often have two modes. One is a high-quality stereo for listening. The other is a call profile (hands-free) that uses lower bandwidth so the mic can work.
Signs Windows switched modes:
- Audio suddenly gets tinny or “AM radio” quality.
- The drop happens right when an app opens the mic.
- The mic starts sounding over-filtered or unstable.
Keep that in mind for the Bluetooth section later, which explains how to reset the pairing and force Windows back to the right devices.
How do I enable noise suppression in Windows 11?
Windows doesn’t show the same options on every PC. Some systems have a clear noise suppression toggle, others rely on driver tools (often Realtek) or app settings. Still, it’s worth checking the built-in path first, because it controls the base mic pipeline.
If the system supports it, the microphone noise suppression Windows 11 options appear here:
- Settings > System > Sound > Input
- Select the correct microphone from the dropdown
- Look for items like Audio enhancements, Advanced, Format, or sometimes Studio effects
For cases where Windows settings don’t show any suppression options, Microsoft Q&A threads like this one help confirm it’s sometimes hardware or driver dependent:
Turn on microphone permissions so apps can use your mic
Privacy blocks can appear as “noise cancel is broken” because the app may fall back to another mic.
Go to:
Settings > Privacy & security > Microphone
Check these toggles:
- Microphone access
- Let apps access your microphone
Then scroll down and confirm the specific app is allowed (Teams, Zoom, Discord, browser).
Quick reset that often works when it used to be fine:
- Toggle Microphone access off.
- Reboot.
- Toggle it back on and test again.
Check Windows Studio Effects and Voice Focus (especially after 24H2 updates)
Some Windows 11 PCs show Studio effects in Quick Settings (press Win + A). Options can include background effects and voice features like Voice Focus.
For testing:
- Open Win + A
- Find Studio effects (if they exist)
- Turn Voice Focus off, then record a quick Voice Recorder clip
Not seeing Studio effects is normal. Many desktops and older laptops won’t have it.
How to fix microphone noise suppression in Windows 11 (step by step)
When noise suppression is not working, Windows 11 shows up across apps; a clean troubleshooting flow beats random toggling. The goal is to get a stable baseline in Voice Recorder first, then add features back one at a time.
- Set the correct input device
- Settings > System > Sound > Input
- Choose the headset mic (or the USB mic you actually use)
- Speak and watch the input level meter move
- Disable enhancements for testing
- In the mic properties page, set Audio enhancements to Off
- If there’s an Enhanced audio toggle, turn it off
- Check mic level and mic boost
- If audio is clipping, suppression can sound worse
- Lower Input volume slightly
- If there’s a Mic boost, reduce it (boost often adds hiss)
- Run the Windows audio troubleshooter
- Settings > System > Troubleshoot > Other troubleshooters
- Run Recording Audio
- Apply suggested fixes, then re-test
- Restart Windows audio services (safe reset)
- This often fixes sudden “everything got noisy” moments after sleep or docking
- Re-test in Voice Recorder
- Same room, same distance from the mic
- If the recording improves here, the meeting app settings are the next place to look
A helpful reference for Bluetooth and headset oddities that pop up on Windows 11 is Microsoft Q&A, where users describe the same profile switches and quality drops:
Turn off audio enhancements and spatial sound to rule out conflicts
This is a troubleshooting step, not a permanent rule. It answers one question fast: “Is something processing the mic twice?”
Where to check:
- Settings > System > Sound > Input > (your mic)
- Set Audio enhancements to Off (or “Disable all enhancements” if shown)
If you need the old Control Panel view:
- Open Control Panel > Sound
- On the Recording tab, open your mic
- Check tabs like Enhancements or Advanced (varies by device)
Double processing is common. Example: Windows enhancement on, Realtek noise reduction on, and Teams suppression on. The result can be a voice that pumps, cuts out, or sounds watery.
Restart Windows Audio services when the mic suddenly gets noisy
If the mic was fine yesterday and is terrible after waking the laptop, a service restart can help.
Steps:
- Press Win + R, type
services.msc, press Enter. - Find Windows Audio, right-click, choose Restart.
- Find Windows Audio Endpoint Builder, right-click, and choose Restart.
- Re-open Voice Recorder and test again right away.
Sound may cut out for a few seconds during the restart. That’s expected.
Realtek noise cancelling Windows 11 fixes (Realtek Audio Console tips)
Realtek noise-cancelling behavior in Windows 11 often depends on the laptop maker’s driver package. Windows Update can install a generic driver that works, but it may not expose the Realtek noise controls that came with the machine.
How to check if Realtek is involved
- Open Device Manager
- Expand Sound, video and game controllers
- Look for Realtek(R) Audio (or similar)
If it’s a laptop from HP, Dell, Lenovo, ASUS, Acer, MSI, or a similar brand, the best next step is often the OEM driver download page, not just Windows Update. OEM packages can restore missing Realtek features and add the matching console app.
If Realtek Audio Console is installed, open it and look for:
- Microphone effects
- Noise suppression or Noise reduction
- Beam forming (on some models)
Keep the first test simple: turn noise suppression on (or off) and record a clip. Don’t change five settings at once.
A longer discussion of Realtek configuration and common issues is collected here:
If Realtek Audio Console is missing, it usually means a driver mismatch
This often happens after a major Windows update or after swapping between OEM and Windows drivers.
A simple action list:
- In Device Manager, find the audio device.
- Uninstall the device (advanced users may choose to remove the driver as well, but it’s optional).
- Reboot.
- Install the latest OEM audio driver package from the laptop maker’s support site.
- If the console still doesn’t appear, check the Microsoft Store for the Realtek console app that matches the driver (availability varies by device).
Driver rollback and reinstall, the safest way to undo a bad update
If the timing matches a recent driver update, rolling back is often faster than hunting settings.
Path:
- Device Manager > Sound, video and game controllers
- Open your audio device (Realtek or headset)
- Properties > Driver
- Select Roll Back Driver (if available)
If rollback is not available:
- Choose Uninstall device
- Restart the PC and test again
Test after each change. It’s easier to spot what fixed it.
Windows 11 mic background noise issue after an update, what to do

A Windows 11 mic background noise issue often appears right after a cumulative update, a feature update, or a driver update delivered via Windows Update. The best approach is cautious and timed.
Start with quick verification:
- Settings > Windows Update > Update history
- Look for audio, Bluetooth, or system driver installs around the same day the problem started
Then try these fixes in order:
- Update audio drivers and Bluetooth drivers from the PC maker’s support site.
- If using a USB mic, switch to a different USB port (avoid unpowered hubs).
- Reboot and re-test in Voice Recorder after each change.
- If the issue began immediately after a Windows update, consider uninstalling that update. Only do this when the timing is clear, and re-apply updates later when a fix ships.
For user reports that match the “Windows started filtering my audio even with enhancements off” pattern, this Microsoft Q&A thread shows how stubborn this can be when an app opens the mic:
Bluetooth headphones noise suppression issues (hands-free vs stereo)
When Bluetooth is the cause, the fix is often a clean re-pair plus forcing the correct input and output selections.
Steps:
- Settings > Bluetooth & devices > Devices
- Select the headset, and choose Remove device
- Restart the PC
- Put the headset into pairing mode, then add the device again
- Go to Settings > System > Sound
- Set the headset as the correct Output, and select the correct Input (headset mic, if needed)
Wired mode is the best test. If a wired connection makes the mic sound normal, Bluetooth profile switching is the likely culprit.
For Bluetooth headset problems reported by Windows 11 users, this Microsoft Q&A post is a useful comparison point:
Teams’ noise cancellation not working on Windows 11; app settings can override Windows
Teams can override Windows mic processing. It can also stack its own suppression on top of driver effects, which can make voices sound thin or choppy.
In Teams:
- Open Settings > Devices
- Under Audio devices, pick the correct Microphone
- Find Noise suppression and test Off, Auto, then High
- Run a test call and listen to the recording
If the voice gets worse on High, turn it back to Auto, and make sure Windows or Realtek enhancements aren’t doing the same job at the same time.
The fixes most guides forget (quick wins from real-world troubleshooting)
These checks are quick, and they solve stubborn cases more often than people expect.
- Test in Voice Recorder first: It separates Windows problems from app problems in one minute.
- Reset mic privacy permissions: Toggle mic access off, reboot, toggle on, then test.
- Set Communications to “Do nothing”: Control Panel > Sound > Communications tab, choose Do nothing so Windows doesn’t change audio during calls.
- Turn off Exclusive mode for troubleshooting: In your mic properties (Advanced), uncheck exclusive mode options, test again.
- Restart Windows Audio services: A fast reset when audio suddenly changes after sleep.
FAQ
Why isn’t noise-cancelling working in Windows 11?
Most cases come from the wrong input device, a Bluetooth profile switch, or a driver setting that changed after an update. Start by testing in Voice Recorder. If it’s bad there, focus on Windows settings, services, and drivers before changing Teams or Zoom options.
How do I enable noise suppression in Windows 11?
Go to Settings > System > Sound > Input, select the correct microphone, and look for Audio enhancements or related options. Then confirm mic access under Settings > Privacy & security > Microphone. Some PCs don’t show built-in suppression controls because they rely on OEM drivers.
Why does Realtek noise cancelling not work in all apps?
Some apps apply their own processing and can override driver settings. In other cases, a generic driver from Windows Update removes Realtek console features, so the toggle never takes effect. Installing the OEM audio package usually restores full control.
Why is Teams noise cancellation not working on Windows 11?
Teams has its own noise suppression settings, which can conflict with Windows enhancements or Realtek effects. Pick the correct mic in Teams > Settings > Devices, then test Off, Auto, and High using a Teams test call. Keep only one layer of suppression active while testing.
Conclusion
Most fixes come down to the basics: select the right mic, confirm privacy permissions, and turn enhancements off long enough to test clean audio. If the problem started after an update, check drivers next, especially Realtek and Bluetooth. Then verify app settings, since Teams can override Windows behavior.
If the problem still looks like noise cancelling not working on Windows 11, re-test in Voice Recorder and work outward from Windows, to drivers, to Bluetooth, to the app.

Related Articles