How To Install Windows 11 On Unsupported CPU (Safe, Tested Methods)

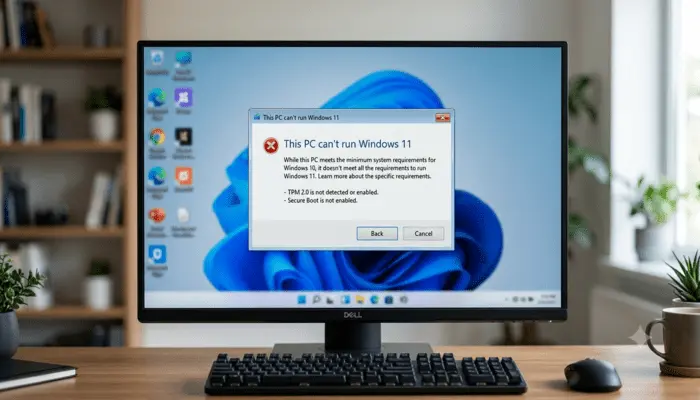
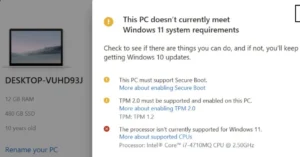
Many users search for how to install Windows 11 on unsupported CPU after seeing the message “This PC can’t run Windows 11” on a machine that still feels fast. It is a common situation for people with older but capable Intel or AMD processors who want to move on from Windows 10 without buying a new PC.
This guide is for intermediate Windows users and PC enthusiasts who are comfortable creating a bootable USB drive, entering the BIOS/UEFI, and following clear, step-by-step instructions. The goal is simple: install Windows 11 on an unsupported processor with as little confusion and risk as possible.
The article explains what “unsupported CPU” really means, then walks through two primary methods, registry bypass and bootable USB media, with detailed steps. It also covers performance, updates, and when staying on Windows 10 is the better option. The process can be done in one sitting if you prepare backups first and follow each step carefully.
What An Unsupported CPU Really Means For Windows 11
Microsoft keeps an official list of processors that it supports for Windows 11. If your CPU is not on that list, the installer reports it as “unsupported.” This covers many older, but still capable, Intel Core and AMD Ryzen chips.
According to the official Windows 11 specs and system requirements, a PC must meet a set of hardware checks. These checks are stricter than with Windows 10 and focus strongly on security and modern features.
Key Windows 11 requirements include:
- 64-bit CPU, on Microsoft’s supported list
- 4 GB of RAM or more
- 64 GB or more storage
- TPM 2.0 (Trusted Platform Module)
- Secure Boot support in UEFI
- DirectX 12 compatible graphics
- Display of at least 720p, 9 inches or larger
Recent Windows 11 builds also depend on certain CPU instruction sets, such as SSE4.2 and POPCNT. These are low-level CPU features used by newer code. Many processors released within roughly the last decade support them. Very old chips can fail here even if you bypass the official CPU list check.
Microsoft tightened requirements for several reasons: stronger security by default, better virtualization support, and a more consistent baseline for new features. From a practical perspective, the company chose to officially support only newer platforms and focus testing and patches there.
As of late 2025, Windows 10 is still widely used but nearing the end of its support lifecycle. Microsoft has announced that Windows 10 Home and Windows 10 Pro will reach end of support on October 14, 2025. After that, regular security updates for home users stop.
At the same time, many homes and small offices still run older hardware that works well for daily tasks. This is why a Windows 11 unsupported hardware workaround is so relevant now.
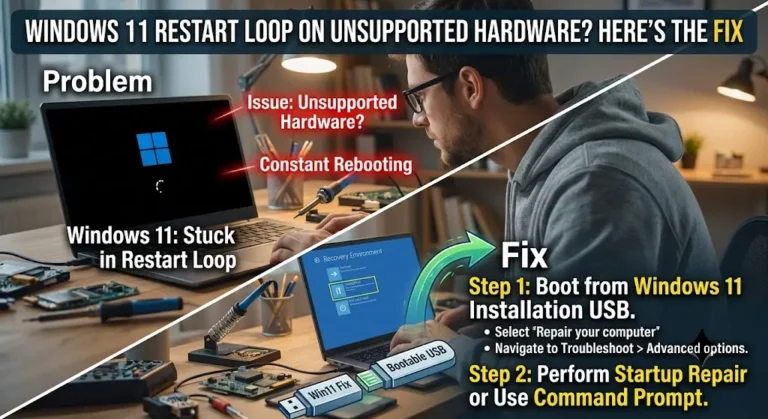
SEE ALSO: Windows 11 Stuck in Restart Loop on Unsupported Hardware? Here’s the Fix
Why Your CPU Fails The Windows 11 Check Even If Your PC Still Feels Fast

Many systems with 4th-generation Intel Core processors, early Ryzen chips, or older Xeon CPUs run games, office apps, and browsers without trouble. In daily use, these machines feel fine, especially if upgraded with an SSD and enough memory.
They fail the Windows 11 check because Microsoft only backs a defined list of processors. Unsupported does not mean the CPU is broken. It reflects a support and policy decision from Microsoft. The installer checks the CPU against its internal list and blocks the install if no match is found, even when raw performance remains strong.
For users, this can feel unfair. The hardware runs modern software, but the installer stops for policy reasons, not because the machine cannot boot the OS at all.
Key Windows 11 Requirements You Should Know Before You Bypass Them
Before trying any bypass, it helps to understand the main requirements in simple terms:
- CPU generation: 8th-gen Intel Core and newer, or Ryzen 2000 and newer, are on the official list. Older chips are blocked by policy.
- 64-bit architecture: Windows 11 is 64-bit only, no 32-bit edition.
- RAM: At least 4 GB, but 8 GB or more is recommended.
- Storage: At least 64 GB free space, SSD is strongly preferred.
- TPM 2.0: A small security chip or firmware function that supports features like BitLocker and secure storage.
- Secure Boot: A UEFI setting that checks system boot files for tampering.
- Graphics: DirectX 12 capable GPU or integrated graphics.
- CPU instruction sets: Features like SSE4.2 and POPCNT help newer code run correctly.
Even if this guide helps you bypass some checks, the closer your system is to these requirements, the smoother Windows 11 will run.
Why This Topic Matters Now: Windows 10 Support Timeline And Upgrade Pressure
Windows 10 reaches the end of support for most home and small-office users in October 2025. After that, no regular security patches arrive unless you pay for specialized programs. Over time, this creates more security risk.
At the same time:
- New apps and games are starting to target Windows 11 first.
- New features from Microsoft arrive on Windows 11, not on Windows 10.
- Many people want to avoid buying a whole new PC when their current hardware still works.
Learning how to install Windows 11 on unsupported CPU gives you more options. You can extend the useful life of existing hardware, at least for secondary or personal machines, while you plan future upgrades.
Before You Start: Check Hardware, Back Up, And Choose Your Install Plan
Preparation is the most important part of this process. It reduces the chance of data loss and failed installs.
Check If Your Older Intel Or AMD CPU Is Still A Good Fit For Windows 11
In practice, many CPUs from the last 10 or so years can run Windows 11 well when paired with enough RAM and an SSD.
You can do quick checks:
1. Confirm 64-bit support
- In Windows 10, open Settings, then System, then About.
- Look at “System type.” It should say 64-bit operating system and x64-based processor.
2. Check core count and general performance
- Open Task Manager, go to the Performance tab, then CPU.
- You can see core count and base speed. For a smooth Windows 11 experience, four cores or strong dual cores with high clock speeds work better.
3. Check SSE4.2 and POPCNT support.
- Tools like CPU-Z or similar utilities list supported instruction sets.
- Most Intel Core processors from at least the 4th generation and most Ryzen chips support SSE4.2 and POPCNT.
- Very old CPUs, such as Core 2 Duo or first-generation Phenom, may lack these features or experience stability issues on newer builds.
If your CPU is 64-bit, has SSE4.2 and POPCNT, and the PC has at least 8 GB of RAM and a solid-state drive, Windows 11 usually feels fine in everyday use, even if it is marked as unsupported.
Back Up Your Files So A Failed Install Does Not Ruin Your Day
Backups are not optional here. An upgrade can fail. A partition can be accidentally wiped. Protect your data before anything else.
Practical backup steps:
- Copy your Documents, Pictures, Desktop, and any game saves or project folders to an external drive.
- Use a cloud service for critical files that you cannot replace.
- If you know how, create a full system image of your current Windows 10 install. This gives a direct path back if something breaks.
Write down or export:
- Software license keys.
- Saved passwords if they are not synced to a cloud account.
You may also want to create a Windows 10 USB installer or recovery drive. If Windows 11 isn’t working well, you can reinstall Windows 10 and restore your data.
Choose Between In-Place Upgrade And Clean Install On Unsupported CPUs
You have two main paths:
In-place upgrade:
- Start the Windows 11 setup from within Windows 10.
- Keep your files, apps, and most settings.
- Uses less time but can carry old bugs and clutter into the new system.
Clean install:
- Boot from a USB drive and install Windows 11 on a wiped or formatted system partition.
- Removes old problems and often improves performance.
- Requires reinstalling apps and restoring data from backup.
For many users, an in-place upgrade with a Windows 11 registry bypass is the fastest and least disruptive option. If your current Windows 10 install already feels slow or messy, a clean install with a bootable USB Windows 11 install is often the better long-term route.
Quick BIOS/UEFI Checks: Boot Mode, Secure Boot, And USB Boot
You may need to enter your BIOS or UEFI setup to adjust boot options:
- When turning on the PC, press keys like F2, Del, F10, or Esc repeatedly. The right key often appears briefly on screen.
- Inside BIOS/UEFI, look for the Boot section.
Check that USB boot is enabled.
- If you plan to boot from a USB drive, set that USB device near the top of the boot order or use a one-time boot menu, often on F12 or Esc.
Secure Boot is usually under the Security or Boot menus.
- Many users can leave Secure Boot on when using tools that handle bypasses.
- If you run into boot problems, you can temporarily turn it off, then turn it back on later.
If you change any settings, write down the original values so you can revert them if something goes wrong.
Method 1: Use A Registry Bypass To Install Windows 11 On An Unsupported CPU
This method uses the official Windows 11 ISO from Microsoft and a manual registry tweak. It works well for in-place upgrades from Windows 10.
You do all the steps yourself. No third-party scripts are involved. This reduces some risk but requires attention to detail.
Warning: Editing the registry can break Windows if done incorrectly. Follow the steps closely and keep backups ready.
Download The Official Windows 11 ISO And Start Setup From Windows 10
- Go to Microsoft’s Windows 11 download page.
- Download either the Windows 11 ISO directly, or use the Media Creation Tool to create an ISO.
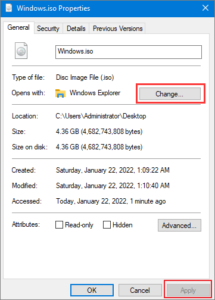
- In Windows 10, right-click the ISO file and select Mount.
- The ISO appears as a new drive in File Explorer.
- Open that drive and double-click setup.exe.
- Choose whether to download updates during setup.
- Continue until the installer checks your PC.
- When it sees an unsupported CPU or a missing TPM 2.0, it may show “This PC can’t run Windows 11.”
Do not close the installer when you see that message. The registry bypass happens at this stage.
Create The LabConfig Registry Keys To Bypass CPU And TPM Checks
During the blocked setup screen:
- Press Shift + F10 to open a command prompt.
- Type
regeditand press Enter to open the Registry Editor.
The registry is a database that stores system settings. By adding specific keys, you tell the Windows 11 installer to skip some checks.
- In Registry Editor, navigate to:
HKEY_LOCAL_MACHINE\SYSTEM\Setup
- Right-click the Setup key in the left panel.
- Choose New, then Key, and name it LabConfig.
- Select the new LabConfig key.
Now add values that bypass checks:
- Right-click in the right panel, choose New, then DWORD (32-bit) Value.
- Name it BypassTPMCheck.
- Double-click it, set the Value data to
1, and click OK. - Repeat to add BypassSecureBootCheck with value
1. - Repeat to add BypassCPUCheck with value
1.
In plain language:
- BypassTPMCheck tells the installer to ignore the TPM version check.
- BypassSecureBootCheck tells it not to block the install if Secure Boot is off or missing.
- BypassCPUCheck tells it to skip the supported CPU list check.
Close Registry Editor and the command prompt when you are done.
Finish The Upgrade And What To Expect On First Boot
Return to the Windows 11 setup window:
- Click the back arrow, then move forward again, or restart the compatibility check if needed.
- The “This PC can’t run Windows 11” screen should no longer appear.
- Accept the license terms and choose to keep personal files and apps if you want an in-place upgrade.
- Start the installation.
The PC may reboot several times. On older hardware, this process can take longer than expected. Avoid interrupting it.
On first boot into Windows 11:
- You see the out-of-the-box setup screens.
- Sign in with your Microsoft account or local account.
- Let Windows Update run and install drivers and patches.
- Check Device Manager for any missing drivers and install vendor drivers if needed.
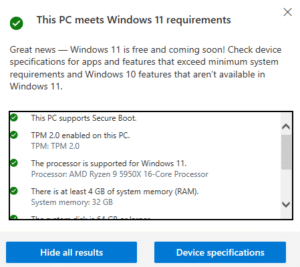
In testing on unsupported 4th-gen Intel Core and early Ryzen CPUs with at least 8 GB of RAM and SSD storage, Windows 11 ran smoothly after this registry bypass. Performance in daily tasks was close to, or slightly better than, that of a tuned Windows 10 install on the same hardware.
Pros And Cons Of The Registry Bypass Method
Pros:
- Uses official Microsoft ISO only.
- No external bypass tools or scripts.
- Supports in-place upgrade that keeps files and apps.
- Good choice when Windows 10 already runs well.
Cons:
- Requires manual registry edits, which carry risk if done wrong.
- Only works if the current Windows 10 install can boot and run the setup.
- Does not fix deep issues with a cluttered or unstable Windows 10 system.
- If Microsoft changes the installer logic in later builds, steps may need to be updated.
For many intermediate users, this is a reasonable first attempt if they want to keep the current data and apps.
Method 2: Create A Bootable USB That Skips Windows 11 CPU Checks
This method uses a bootable USB drive created with a utility such as Rufus. The tool modifies the setup files so that the installer no longer blocks unsupported CPUs, missing TPM 2.0, or disabled Secure Boot.
A bootable USB drive is a flash drive you can start the computer from instead of the internal disk. It acts like installation media.
This approach is well-suited for clean installs and for fixing systems that do not boot properly.
Prepare A Windows 11 ISO And Your USB Drive
You need:
- An 8 GB or larger USB flash drive.
- The Windows 11 ISO file downloaded from Microsoft.
- The Rufus utility, which is free and widely used.
Steps:
- Copy any critical data off the USB drive. It will be erased.
- Download and open the latest version of Rufus.
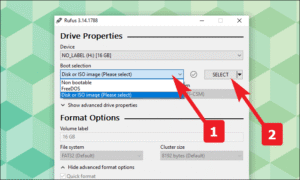
- Under Device, select your USB drive.
- Under Boot selection, choose Disk or ISO image, then click Select and pick the Windows 11 ISO file.
- For most modern systems, choose Partition scheme: GPT and Target system: UEFI (non CSM).
This matches typical UEFI setups on systems made in the last decade.
Use Rufus Options To Disable CPU, TPM, And Secure Boot Checks
When you click Start in newer Rufus versions with a Windows 11 ISO, a dialog appears with options related to Windows 11 requirements.
Typical Rufus options for unsupported hardware:
- Remove requirement for 4 GB+ RAM
- Remove requirement for Secure Boot
- Remove the requirement for TPM 2.0
- Remove the requirement for a supported CPU
Check the boxes that match your situation, usually all that relate to TPM, Secure Boot, and CPU. These choices modify the installation files so that Windows 11 does not block installation on older hardware.
You can also choose options to skip some regions and privacy questions during setup, but that is optional.
When ready:
- Confirm that the correct USB drive is selected.
- Click Start.
- Wait for Rufus to write the image and finish.
You now have a bootable USB Windows 11 installation drive that applies an unsupported Windows 11 hardware workaround during setup.
Boot From The USB And Install Windows 11 On Unsupported Hardware
To use the USB:
- Insert the USB drive into the target PC.
- Power on the PC and open the one-time boot menu with keys like F12, Esc, or F8, depending on the motherboard.
- Choose the USB drive from the list.
- The Windows 11 installer should start.
You can take two paths:
- Upgrade without wiping:
- Choose the current Windows partition.
- Tell setup to keep files when prompted.
- This path is less common with USB, but it is possible.
- Clean install:
- At the disk screen, select the partition that holds Windows 10.
- Backups should already be done.
- Delete or format that partition, then choose it as the target for Windows 11.
If you use a mix of legacy BIOS and UEFI, or very old systems, USB boot issues may appear. In such cases, try:
- Switch the USB to another port.
- Checking that the USB was created for the correct boot mode (UEFI vs legacy).
- Adjusting BIOS settings to favor UEFI boot with GPT drives.
Registry Bypass Vs Bootable USB: Which Method Is Better For You?
In practice:
- The registry bypass method is better when:
- Windows 10 boots and runs fine.
- You want to keep your apps and data with minimal setup.
- You prefer to avoid third-party tools.
- The Rufus-style USB method is better when:
- You want a fresh start and the best performance.
- Your current Windows install is broken or unstable.
- You need to install Windows 11 on several unsupported PCs.
Many enthusiasts keep a Rufus USB on hand and use it to test Windows 11 on different machines.
What It Is Like To Run Windows 11 On An Unsupported CPU
Once installed, Windows 11 usually runs like it does on supported hardware if your CPU and memory are reasonably modern.
Performance, Boot Time, And Everyday Use On Older CPUs
In testing on mid-range hardware such as:
- 4th gen Intel Core i5 and i7 with 8 to 16 GB of RAM.
- Early Ryzen 5 and Ryzen 7 processors with SSDs.
Windows 11 showed:
- Boot times close to or slightly faster than Windows 10 when using an SSD.
- Smooth web browsing, office work, and media playback.
- Games run at similar frame rates to Windows 10 when using the same drivers.
For systems that already have the SSE4.2 and POPCNT instruction sets, there were no consistent crashes directly tied to the unsupported status. Performance mainly depended on RAM, storage speed, and the GPU, not on whether the CPU was on or off the official list.
On very old processors without these instruction sets, or with only 4 GB of RAM and a slow hard drive, Windows 11 felt heavy and at times unstable.
Windows Updates, Drivers, And Long Term Support On Unsupported Hardware
As of late 2025:
- Many unsupported CPUs still receive monthly cumulative updates after installing Windows 11 with a bypass.
- Feature updates (big version jumps) can be more fragile and may fail or require repeated attempts.
- Microsoft has stated that updates on unsupported hardware are not guaranteed. The company can change its behavior at any time.
If a feature update fails:
- Windows often rolls back to the previous build automatically.
- You can pause feature updates or set metered connections to reduce unwanted major upgrades.
- In some cases, performing a clean install from a newer ISO is the simplest way to upgrade to a later version.
Drivers for older integrated graphics or Wi-Fi cards can cause more trouble than the CPU itself. You may need to:
- Download vendor drivers from Intel, AMD, or the motherboard maker.
- Use older driver versions if the latest one does not behave well on your hardware.
Treat unsupported systems more like test or secondary machines. For mission-critical work, supported hardware is safer.
When Windows 11 Is Not Stable Enough And Windows 10 Is The Better Choice
Some situations favor staying with Windows 10:
- CPU lacks SSE4.2 or POPCNT, and newer Windows 11 builds crash or show odd errors.
- The system has only 4 GB of RAM and a spinning hard drive. Performance is poor even on a fresh install.
- Rare chipset bugs cause freezes or blue screens under Windows 11 that do not appear in Windows 10.
In these cases, a tuned Windows 10 install, with an SSD upgrade if possible, is usually more stable and less stressful. It is not a failure to stay with Windows 10 if your hardware is too old or limited.
Troubleshooting, Common Mistakes, And FAQ For Unsupported CPU Installs
Problems during or after installation are common on older systems. Many are easy to correct.
Fix Setup Freezes, USB Boot Problems, And Driver Errors
Common issues and simple checks:
Installer stuck on logo or spinning dots
- Wait longer than you think, at least 20 to 30 minutes on very old hardware.
- Unplug non-essential USB devices such as printers and external drives.
- Test your RAM with built-in memory diagnostics if the hang repeats.
USB not showing in boot menu
- Try another USB port, preferably a USB 2.0 port on older boards.
- Recreate the USB drive in Rufus, making sure the GPT + UEFI or MBR + BIOS option matches your system.
- In BIOS/UEFI, enable “USB boot” or a similar option.
Setup does not see your drive
- In rare cases, you need to load SATA or NVMe drivers from another USB.
- Check that RAID or special controller modes are not blocking the installer.
- For very old systems, switch the controller to AHCI if it is safe to do so.
Crashes during install
- Check system temperatures and clean the fans of dust.
- Remove overclocks on CPU or RAM.
- Test the drive for bad sectors with vendor tools.
If problems persist, a clean install from a USB drive often resolves issues that occur during in-place upgrades.
Why You Still See “This PC Can’t Run Windows 11” After Bypassing Checks
Even with a bypass, the error can still appear:
Common causes:
- Missed registry key: BypassCPUCheck, BypassTPMCheck, or BypassSecureBootCheck was not created or is not set to 1.
- Wrong ISO or build: Very old Windows 11 ISOs may behave differently and refuse to run on your hardware.
- Outdated tools: Older versions of Rufus may not include all the latest bypass options.
- Other requirements failing: Not enough free disk space, or legacy BIOS mode with a GPT-only setup or Secure Boot conflict.
Quick checklist:
- Use a recent Windows 11 ISO from Microsoft.
- Use the latest Rufus version if you go the USB route.
- Recheck the spelling of each registry key when using Method 1.
- Confirm hardware basics: 4 GB RAM minimum, 64 GB free space, 64-bit CPU.
If all checks look correct, recreate your USB or restart the setup from a fresh ISO.
FAQ: Safety, Legality, Updates, And Rolling Back To Windows 10
Is it safe to install Windows 11 on an unsupported CPU?
It is reasonably safe if you use official ISOs, trusted tools like Rufus, and keep backups. There is some extra risk because your configuration is not officially tested, and updates may behave less predictably.
Is it legal to bypass Windows 11 CPU requirements?
If you have a valid Windows license, using registry tweaks or installer options to bypass hardware checks is generally allowed for personal use. You are not changing Microsoft’s code in a way that redistributes it, but you are moving outside the supported hardware policy.
Will Windows Update work if I install Windows 11 on unsupported hardware?
In many cases, yes. Security and quality updates often install as usual, at least for now. Microsoft does not promise this will always continue, so there is some long-term uncertainty.
Can I go back to Windows 10 if something goes wrong?
Yes, if you prepared. With a complete system image or a fresh Windows 10 USB installer and file backups, you can restore or reinstall Windows 10. If you recently performed an in-place upgrade, Windows sometimes offers a short window to roll back to the previous version from Settings.
Does this void my warranty or Windows license?
Bypassing CPU checks does not normally void the Windows license itself. Hardware warranties depend on the manufacturer, but installing a different OS version rarely affects them, as long as you do not damage the hardware.
Should You Keep Windows 10, Install Windows 11, Or Upgrade Your Hardware?
The best choice depends on your hardware, risk tolerance, and how you use the PC.
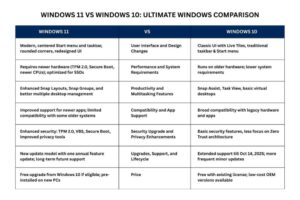
Windows 10 Vs Windows 11 On An Unsupported Processor: Pros And Cons
The table below sums up key trade-offs.
| Option | Pros | Cons |
|---|---|---|
| Windows 10 on current hardware | Stable, familiar, officially supported until 2025 | No new Windows features, support ends soon |
| Windows 11 on unsupported CPU (bypass) | New UI and features, future app support, free upgrade | No official support, possible update issues, and more risk |
| New hardware with a supported CPU + Windows 11 | Full support, best performance, and security | Higher cost, requires migration and reinstall of apps |
For many, installing Windows 11 on an unsupported processor is a good middle step for a secondary PC or personal system, while planning a full hardware upgrade later.
Registry Edit Vs Bootable USB Vs Buying New Hardware
Three main paths:
- Registry edit bypass (Method 1)
- Difficulty: Medium.
- Risk: Mistyped registry entries can cause problems.
- Cost: Free, uses existing hardware.
- Time: Short, especially for in-place upgrades.
- Long-term safety: Depends on hardware quality and future update behavior.
- Bootable USB with bypass options (Method 2)
- Difficulty: Medium, with clear steps.
- Risk: Data loss if you wipe the wrong partition, but the risk to the registry is lower.
- Cost: Free besides a USB drive.
- Time: Longer, especially during a clean install and app reinstall.
- Long-term safety: Often more stable than upgrades, since it starts fresh.
- Buying newer, fully supported hardware
- Difficulty: Higher upfront effort to choose parts and migrate data.
- Risk: Lowest OS support risk, but higher financial cost.
- Cost: Highest, new PC or new CPU/motherboard/RAM combo.
- Time: One-time setup, then a stable, fully supported platform.
- Long-term safety: Best option for work PCs or critical family machines.
For testing, learning, or a backup PC, registry or USB bypass methods are reasonable when done carefully. For a main work system, many users prefer investing in supported hardware to avoid surprises.
Conclusion: Picking The Right Path For Your PC
Installing Windows 11 on an unsupported CPU is possible with clear steps and some patience. The two primary methods, a Windows 11 registry bypass during setup and a customized bootable USB, cover most situations that intermediate users face. The process starts with hardware checks and solid backups, then moves through the chosen method, followed by post-install testing and updates.
In practice, how to install Windows 11 on unsupported CPU comes down to three decisions: keep Windows 10 a bit longer, install Windows 11 with a bypass on your current machine, or move to newer hardware that is fully supported. Each choice carries its own mix of cost, effort, and risk.
Take your time, back up everything, and choose the path that best matches how important this PC is in your daily life. If you decide to proceed with a bypass, follow each step slowly and avoid random third-party scripts. When you are ready for deeper tuning, you can look for guides on Windows 10 optimization, backup basics, or SSD upgrade tips to extend your system’s life even further.

Related Articles